Learning React: The Main Concepts


Mastering these key React concepts will help you very quickly to get up and running with this new front-end library and become a React guru.
Alright. It’s been a while since I’ve sat down and actually wrote something for my blog. So today is a perfect opportunity to fix that by providing you with an eagle’s eye overview of the main React concepts.
You may ask why React? Well, first of all, if you already know JavaScript, React can make you much better at it. You’ll learn how to take advantage of some programming paradigms to make your JavaScript code more maintainable and performant.
Second, there’s a reason why this library has become so popular today, it has some magic that can make creating complex UIs less painful. Things like the virtual DOM, which allows rendering only parts of the page that’s changed is certainly a nice thing to have.
So, without further ado let’s dive right into it.
Components
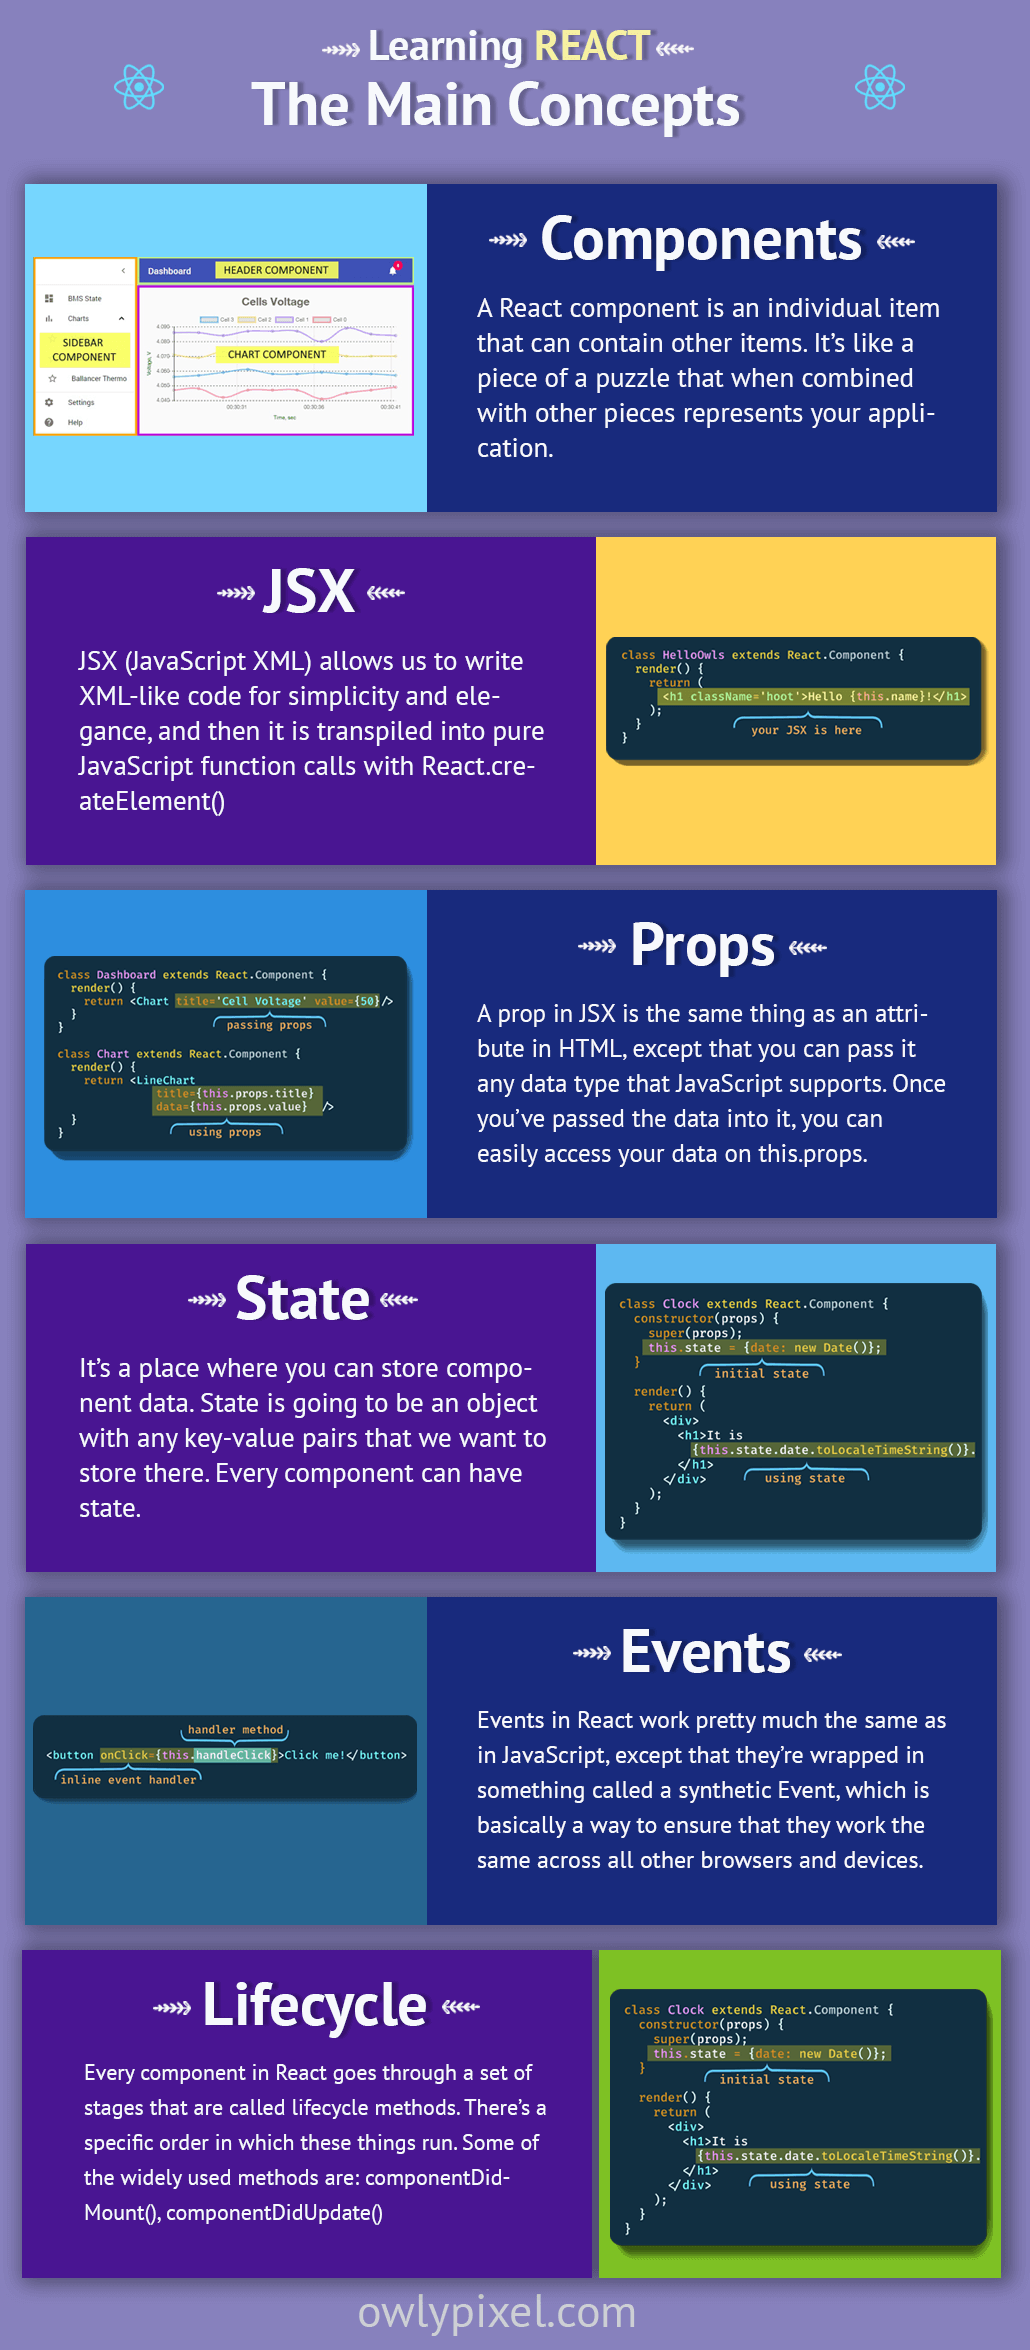
A React component is an individual item that can contain other items. It’s like a piece of a puzzle that when combined with other pieces represents your application.

Components are great because of their reusability. Once you define a component, you’re now able to take that component wherever you want, you just need to supply data for it.
You might have a component that handles logic, for example, processes what happens when the user clicks a button, and then you might have a component that just displays stuff, something like a wrapper, or a container that’s providing data.
Stateless functional components
A simple form of a component is called a stateless functional component which is just a function that takes in data via something called props, returns some JSX and then spits out DOM elements on the page.

Class-based components
There’s also class-based components. You can use them if you need some additional features like state.

Each class-based component has a render() method, which describes how your component will be rendered to the page. That’s where your HTML typically goes.
Things to note here:
- It’s a best practice to capitalize all your classes because lowercase names are reserved for HTML elements.
- The fact that you import React more than once in the different components of your app doesn’t matter. In the end, there’s going to be only one copy.
- You can only return one element from a render method. If you want to return multiple sibling elements, use
<React.Fragment>tag.
JSX
Remember the thing that’s called separation of concerns? The idea that you should write your HTML, CSS, and JavaScript in separate files? Well, React throws that out from a wide open window.
JSX (JavaScript XML) allows us to write XML-like code for simplicity and elegance, and then it is transpiled into pure JavaScript function calls with React.createElement().

In other words, it’s how you create DOM elements and then put them on the page. It looks and feels like a mix of JavaScript and HMTL.
One weird thing about JSX is that there is no logic. If you’ve worked before with templating languages like Handlebars, Pug or EJS you know that they all have their own way of doing conditionals and if statements. But in JSX in most cases you just need to map over the array of data and throw an element on the page, so you can use JavaScript for that logic.
If you prefer not to have any abstractions over JavaScript, an alternative way to write React code would be using React.createElement(). Just like in regular JavaScript you can create elements, render them, you can use all sorts of your regular HTML in JavaScript.
Admittedly, it can be writing a lot of extra code, but it is another way to do things. You don’t really need all those abstractions, you can certainly do everything in JavaScript if you wish so.
Note: In earlier versions of React when you want to add a class to an element in your JSX, you have to write
classNameinstead ofclass.
Data in React
Now let’s look at how does data get into components.
You can take data into your component in three ways: props, state or context.
Let’s say that you have a movie database website and a component called the movie and you want to feed that component an object with the movie title, a description and an image. This can be done by passing props to the component.
Props
A prop in JSX is the same thing as an attribute in HTML, except that you can pass it any data type that JavaScript supports. Once you’ve passed the data into it, you can easily access your data on this.props. If you have React Dev Tools installed, you can use it to peer into a component and see the props and state.

One thing to note here is that data can go down, but it can’t go up from a child to parent component. If you want the data to go through 3-4 levels down, you have to pass it down all the way. Of course, there are a lot of different solutions for this situation, like Context, external data management tools like Redux.
In React you have a couple of different prop types – child props and render props. The default props that React is providing you is called Children.
Render props give you the ability to access things from the parent component in your children.
While the syntax of it leaves much to be desired it allows to make the code way more reusable. You’ll see this in things like Context, Apollo.
Context
Passing data through multiple levels can be cumbersome for certain types of props like locale preference, UI theme. So, smart people from Facebook came up with something called the Context.
It’s something relatively new in React and it’s a way to pass data through the component tree without having to pass props down manually at every level (prop drilling).
You can set your state somewhere and then utilize it via context. All you need is to define your context at the top of the application and then consume it anywhere else in your components.
State
State is another core feature of React. It’s a place where you can store component data. Every component can have state.

State is going to be an object with any key-value pairs that we want to store there.
For example, you can have a form with a couple of inputs where user can enter some data and upload an image. Typically you would mirror that input data to the state and then that state will populate the input. It’s a nice little way to keep it temporarily inside of that component before you submit it to the backend.
Note: When working with state, never modify it directly. Use
setStatemethod instead.
There are some external libraries to manage the state of your application. The one that React comes with is called State and another popular one is Redux. It’ll wrap your data and just inject it directly from the Redux store into the props of your component.
There’s also MobX and some other solutions, but over the years Redux gained the most popularity. However a lot of the community is looking for something else now and some people have turned to Apollo. It’s not as polished as Redux, but they’re definitely working on it.
How to get the data into React components?
If you’re familiar with Angular or jQuery, these libraries have one or another way of fetching data. React doesn’t have that out of the box.
So, how do you fetch the data into the application? Well, you simply need to bring your own tool to do that. You can use relatively new Fetch API or you can use a library called Axios, it’s based on XMLHttpRequests and has manually implemented a lot of things that you get for free with Fetch.
Generally, in one of the lifecycle methods of a component you fetch a list of things that you need from the API, save it to the state and then pass it into props or render it out directly.
The downside to that is that you have to handle your own error states.
Handling events
If you’re building an interactive application you need to handle events like click, hover, form submit and others. Events in React work pretty much the same as in JavaScript, except that they’re wrapped in something called a synthetic Event, which is basically a way to ensure that they work the same across all other browsers and devices.
One other difference that you might find weird is that they’re done inline. You basically have a property or an attribute on your JSX element and that is going to be an event, something like onclick.

Suppose you have a button and an onclick event. In that onclick event you typically run a function or a method that’s defined inside of your class. Or you could just pass your function right in there.
However, you have to be careful with this in JSX callbacks. If you forget to bind this.handleClick and pass it to onClick, this will be undefined when the function is actually called.
The solution to that is instead of declaring a method on the component, you can declare a property which is going to be set to an arrow function. These properties will be bound to the instance and you’ll be able to access this inside of it.
There are so many events out there like clipboard, mouse, media, animation events, but most of them are underutilized.
Lifecycle methods
Every component in React much like a beautiful butterfly goes through a set of stages that are called lifecycle methods. Yes, it has it’s own life!
There’s a specific order in which these things run. Some of the widely used methods are: componentDidMount(), componentDidUpdate().

When the component is being created and inserted into the DOM, the componentDidMount() method is called. If there’s a change in props or state, the componentDidUpdate() method runs, and so on…
So, anytime you want to do something at particular times, that’s probably when you need to reach for a lifecycle method.
If you’re using some external libraries to work with data, then you likely need to reach into these lifecycle methods, add event listeners on componentDidMount() and remove them on componentWillUnmount().
React Hooks
This is something that’s just been released to the public from Facebook. It’s currently in a preview state, so if you want to use it, you have to install an alpha version of React 16.7.
React Hooks is a pretty big topic that deserves a separate article, but I’ll keep it short here, they let you to use state and other React features without writing a class.
Let’s get back a little. As we’ve already found out earlier, we have 2 kinds of components in React: stateless functional components and class-based components. Suppose you have a stateless component in your application and then for some reason you want to convert it to a class-based component to be able to use more React features. Honestly, doing this is not the most fun thing in the world.
Here’s where React Hooks come in. They give us the ability to use state, hooks, context and other stuff in functional components. That’s pretty neat!
Hooks are still in an early stage, but I have a feeling that they’re going to be an important part of React in the future.
Final thoughts:
A lot of the ideas in React are sort of rethinking best practices from other libraries and frameworks like Angular, jQuery or Backbone.
When React came out everybody was opposing it because it gave the boot to the separation of concerns, which is something that we all got so used to. You take HTML, JS, and put everything in one component? No way! That’s nonsense!
And I’m not saying that people were wrong, I get it, if you’ve been doing things for a long time in a certain way, it’s hard to break out of the habit. However, sometimes it’s worth re-examining our defaults and ask ourselves, “Maybe there’s another way of doing things?”.
Clearly, using React may cause some frustration at the beginning, but once you play around with it for a while, it feels really clear and intuitive.
Also, I made a cheatsheet with the content from this post!

You can download it here.
Next Steps
If you would like to learn more here are some resources where you can continue learning React:
- React official documentation
- React For Beginners by Wes Bos
- FullStack Advanced React + GraphQL by the same author
- ReactJS board on Pinterest
- Awesome Intro to React from Ali Spittel
Whoosh! I’ll go drink some homemade apple juice.
Cheers!


