Playing Around with Microsoft Cognitive Services and Computer Vision API
Nowadays computers and IOT devices are getting smarter everyday. That’s great! I always wanted to have a meaningful conversation about intricacies of life with my toaster and this day is relentlessly approaching. Meanwhile, no less amazing ability of computers to read the text from images caught my attention...
Some really smart people at Microsoft Azure implemented this as an actual Computer Vision API. So, let’s take a look at how we can get started with it and try to use it in our own small project.
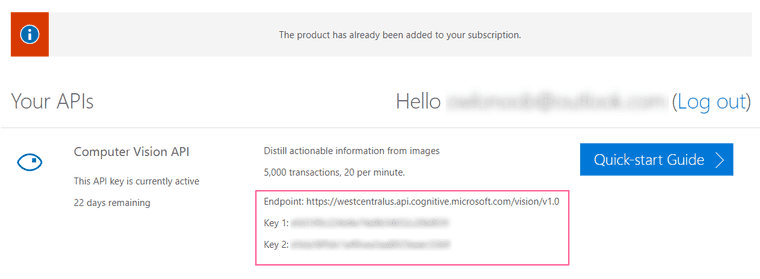
To follow along you’ll need a FREE tier Microsoft Azure account, or you can sign in to Cognitive Services with Facebook, Github, or LinkedIn. With the Free tier account you are rate-limited to 5,000 transactions, 20 per minute, but that’s enough for our purposes. Once you signed in, you should see 2 keys and endpoint URL in your account API section. If you prefer the command line approach, there’s also a possibility to generate an API keys with the help of Azure CLI.
The idea of this project is that we want to create a program that has the ability to read the words in the pictures, sorta like OCR. In this particular example we’re going to create a very serious and useful application – a meme reader.
Step1: Create index.html
First, we are going to create a simple html file:
<!DOCTYPE html><html lang="en"> <head> <meta charset="UTF-8" /> <title>This is a Microsoft Cognitive Services API check!</title> <link rel=stylesheet href="style.css" /> </head> <body> <div class="box-wrapper"> <div class="front"> <h1>Owly Meme Reader</h1> <p>Greetings! This is a small experimental app where you will be exploring and utilizing the amazing powers of OCR to read the text from a meme.</p> <form method="POST"> <div class="input-container"> <label>Computer vision API key: <input id="apiKeyInput" class="pretty" type="text" placeholder="Enter your key" onfocus="this.placeholder = ''" onblur="this.placeholder = 'Enter your key'"/> </label> </div> <div class="input-container"> <label>Image URL: <input id="memeUrlInput" class="pretty" type="url" placeholder="Paste image URL here" onfocus="this.placeholder = ''" onblur="this.placeholder = 'Paste image URL here'"/> </label> </div> <input type="submit" value="Read my meme!"/> </form> </div> <div class="back"> <h1>Recognition results</h1> <img id="resultImage"/> <p id="resultPara">Calculating result...</p> <input type="submit" id="back" value="Read another meme!"/> </div> </div> <script src="index.js"></script> </body></html>As you can see, here we have two sides of a flip-card style layout. The front side contains simple form with 2 inputs, one for API key and one for the image URL. Small side note: we put inputs inside labels here to have better accessibility.
We also have a submit button, so user could actually submit this form. After someone submits the page, we need to show them the image and the extracted text, so it’s probably a good idea to reserve an image and a paragraph tags on the back side of the flip-card layout.
Step2: Start Local Development Server
Next, start a server for local development. It can be a simple python server or anything you have available. It this example we’re using the simplest and easiest of servers on this earth: http-server
If you don’t have one, you can install it globally by typing:
npm install http-server -gAnd then starting it by going into your project directory and typing:
http-serverStep3: Create a JavaScript File
Ok, now we need to create a JavaScript file and name it index.js:
// grabbing our elements from the pageconst form = document.querySelector('form');const apiKeyInput = document.querySelector('#apiKeyInput');const memeUrlInput = document.querySelector('#memeUrlInput');const resultPara = document.querySelector('#resultPara');const resultImage = document.querySelector('#resultImage');const wrapper = document.querySelector('.box-wrapper');const back = document.querySelector('#back');
// getting party started!const onSubmit = (event) => {	event.preventDefault();	const memeUrl = memeUrlInput.value;	const apiKey = apiKeyInput.value || localStorage.getItem('apiKey');	localStorage.setItem('apiKey', apiKey);	resultImage.src = memeUrl;
	getOcrResult(memeUrl, apiKey)		.then(formatResponse)		.then((memeText) => resultPara.textContent = memeText.toUpperCase())		.catch(console.error);	wrapper.classList.add('flip');};
// getting raw result from the APIconst getOcrResult = (memeUrl, apiKey) => {	const apiUrl = 'https://westcentralus.api.cognitive.microsoft.com/vision/v1.0/ocr';	const params = {		'language': 'unk',		'detectOrientation': 'true',		};	const paramsString = Object.keys(params).map((key) => `${key}=${params[key]}`).join('&');	const encodedUrl = `${apiUrl}?${encodeURI(paramsString)}`;
	const headers = new Headers({		'Content-Type': 'application/json',		'Ocp-Apim-Subscription-Key': apiKey		});
	const fetchOptions = {		method: 'POST',		headers,		body: `{"url": "${memeUrl}"}`		};
	return	fetch(encodedUrl, fetchOptions)		.then((response) => response.json())};
// formatting the responseconst formatResponse = (response) => {	return new Promise((resolve, reject) => {		const flatResponse = response.regions.map((region) => {			return region.lines.map((line) => {				return line.words.reduce((wordstring, word) => {					return `${wordstring} ${word.text}`;							}, '');				}).join('');		}).join('');		resolve(flatResponse);	});};
const returnBack = (event) => {	wrapper.classList.remove('flip');}
// attaching event listenersform.addEventListener('submit', onSubmit);back.addEventListener('click', returnBack);
Just a quick note, we’re going to use some ES6 syntax here, so if you’re not familiar with things like fat arrow functions, let and const, you probably should look up them quickly for better understanding.
onSubmit function is kind of a party-starter here. It runs when submit event on the form is triggered. First it grabs values from form inputs and then passes them to the getOCRResult function.
getOCRResult function basically fetches raw recognition results from the Cognitive Service API. Here we also need to specify the URL endpoint which can be found in your account settings.
formatResponse function does guess what? Formats the response! It manipulates the result json and extracts the recognized words from it. Here we have a bunch of nested maps and a reduce, at the end we return a promise. I know, probably it’s not the most elegant code, but it gets the job done.
Step4: Create style.css
So, now we need to make it look pretty. Create a style.css file in the same directory with the following content:
/* Imports */@import url(https://fonts.googleapis.com/css?family=Roboto:400,300,500);
/* Minimal reset */html{	box-sizing: border-box;	}
*{	box-sizing: inherit;	margin: 0;	padding: 0;}
/* Form styles */body {  margin: 0;  padding: 0;  background: #DDD;  font-size: 16px;  color: #222;  font-family: 'Roboto', sans-serif;  font-weight: 300;}.box-wrapper {	position: relative;	perspective: 600px;	-webkit-perspective: 600px;	-moz-perspective: 600px;	margin: 5% auto;	width: 600px;	height: 400px;}.front, .back{	position: absolute;	width: inherit;	height: inherit;	background: #FFF;	border-radius: 2px;	box-shadow: 0 2px 4px rgba(0, 0, 0, 0.4);	padding: 40px;}.front {	top: 0;	z-index: 900;	text-align: center;	-webkit-transform: rotateX(0deg) rotateY(0deg);	   -moz-transform: rotateX(0deg) rotateY(0deg);	-webkit-transform-style: preserve-3d;	   -moz-transform-style: preserve-3d;	-webkit-backface-visibility: hidden;	   -moz-backface-visibility: hidden;	-webkit-transition: all .4s ease-in-out;	   -moz-transition: all .4s ease-in-out;		-ms-transition: all .4s ease-in-out;		 -o-transition: all .4s ease-in-out;			transition: all .4s ease-in-out;}.back {	top: 0;	z-index: 1000;	-webkit-transform: rotateY(-180deg);	   -moz-transform: rotateY(-180deg);	-webkit-transform-style: preserve-3d;	   -moz-transform-style: preserve-3d;	-webkit-backface-visibility: hidden;	   -moz-backface-visibility: hidden;	-webkit-transition: all .4s ease-in-out;	   -moz-transition: all .4s ease-in-out;		-ms-transition: all .4s ease-in-out;		 -o-transition: all .4s ease-in-out;			transition: all .4s ease-in-out;}.box-wrapper.flip .front {	z-index: 900;	-webkit-transform: rotateY(180deg);	-moz-transform: rotateY(180deg);}.box-wrapper.flip .back {	z-index: 1000;	-webkit-transform: rotateX(0deg) rotateY(0deg);	-moz-transform: rotateX(0deg) rotateY(0deg);}h1{	margin: 0 0 20px 0;	font-weight: 500;	font-size: 28px;}p {	margin-bottom: 20px;	text-align: left;}.input-container {	margin: 0 0 15px;}label {	font-weight: 400;}.pretty {	display: block;	border: 4px solid #2980B9;	padding: .65em;	margin: 5px 0;	line-height: 1.15;	width: 100%;}input[type="submit"] {	margin-top: 15px;	width: 100%;	height: 40px;	background: #16a085;	border: none;	border-radius: 2px;	color: #FFF;	font-family: 'Roboto', sans-serif;	font-weight: 500;	text-transform: uppercase;	transition: 0.1s ease;	cursor: pointer;}input[type="submit"]:hover {	box-shadow: 0 2px 4px rgba(0, 0, 0, 0.4);	transition: 0.1s ease;}#resultImage {	display: block;	margin: 0 auto;	max-width: 300px;	max-height: 160px;}#resultPara {	text-align: center;	font-weight: 600;	margin: 20px;}#back {	position: absolute;	bottom: 40px;	width: 86%;	margin-top: 0;}
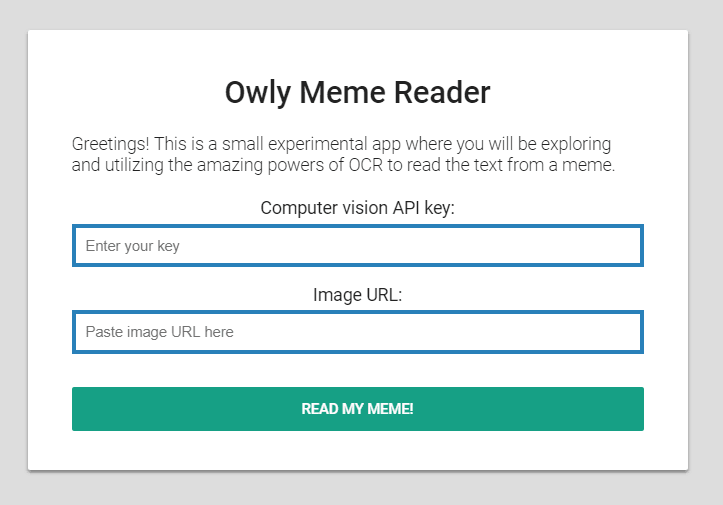
After that you should see something like this on your localhost:8080

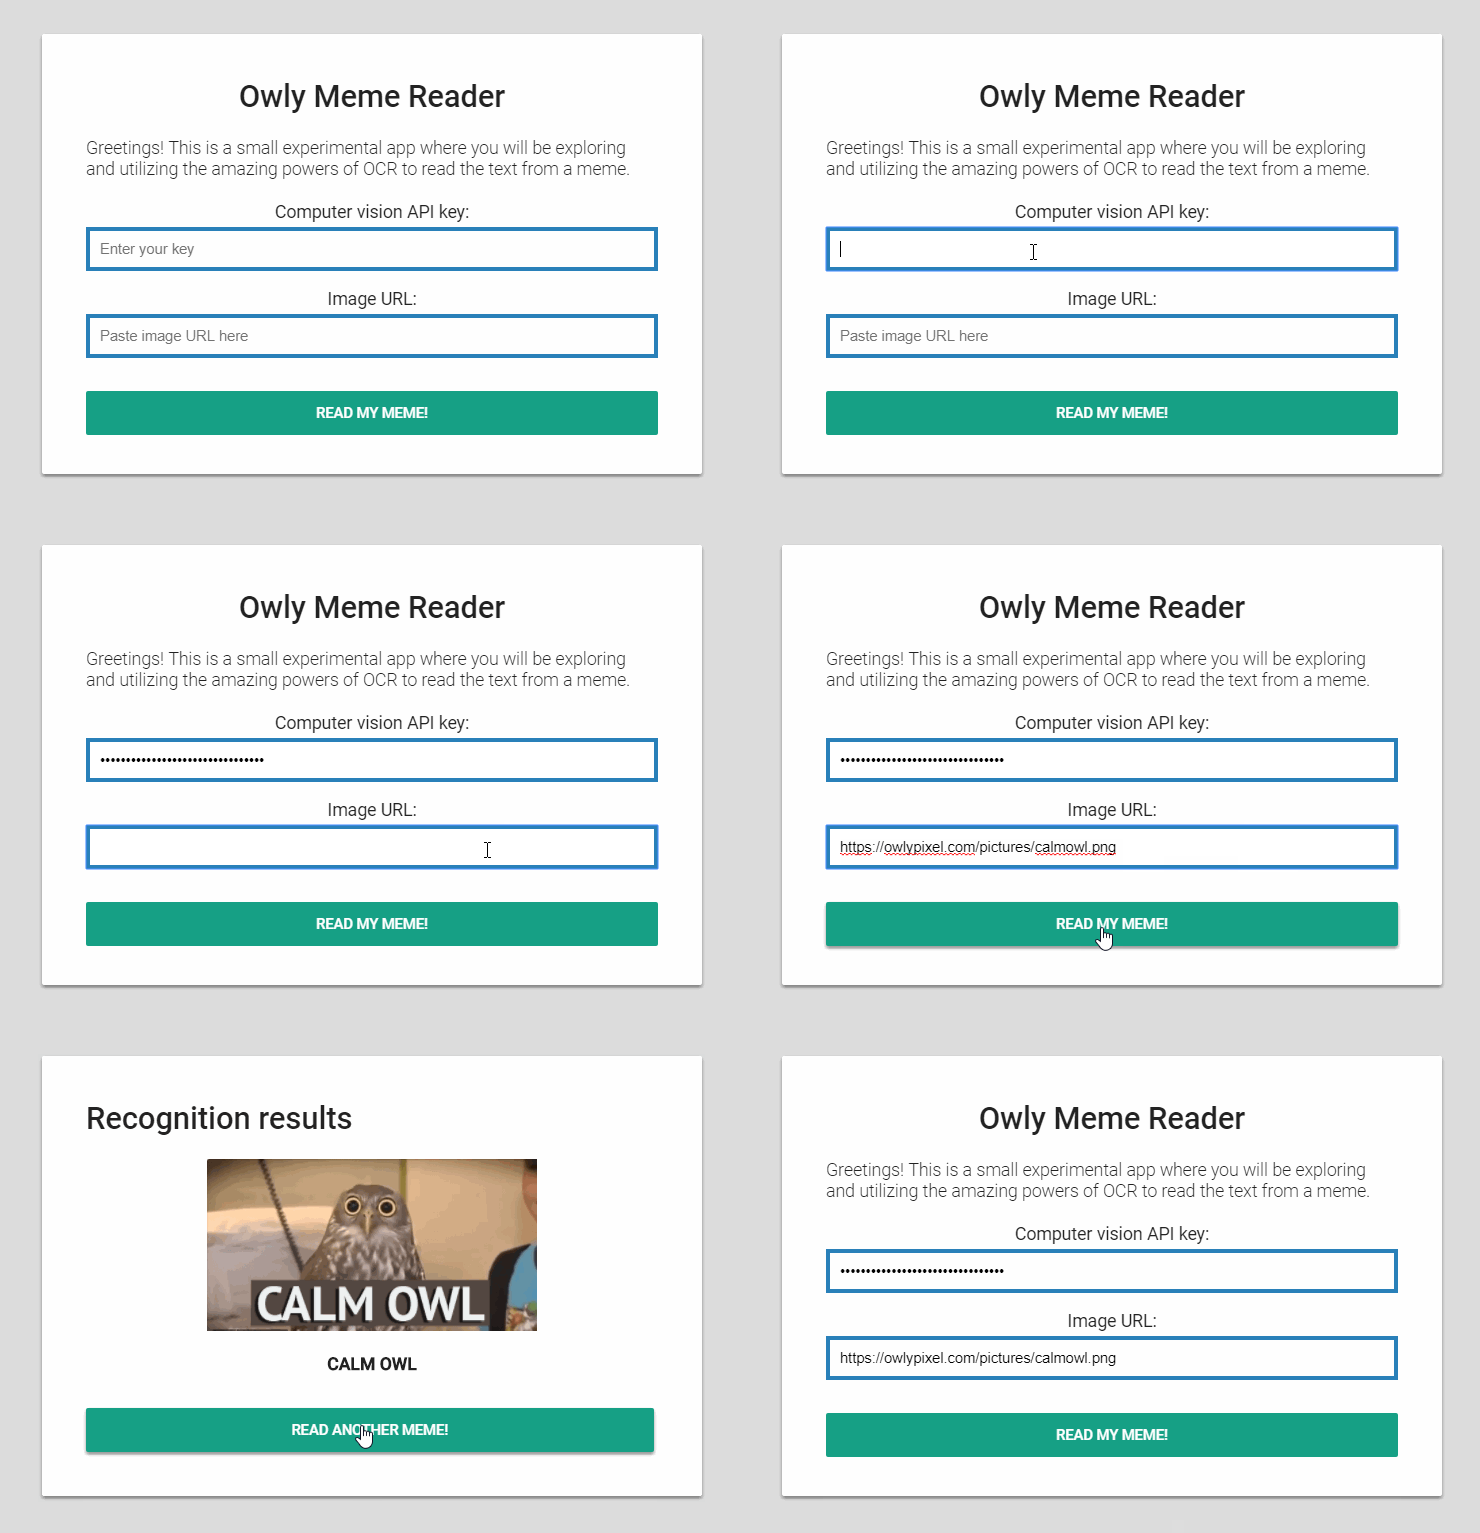
That’s it! The “Owly meme reader” is now ready to perform it’s tasks. Just enter your API key and paste the link for the meme image and click “Read my meme!” button. Again, this is only an experiment, so there may be bugs. But when I tried it on my owlymeme it worked fine. You can see the result in action on the gif below or on GitHubPages:
I find these AI services from Microsoft to be pretty interesting. It’s definitely worth to check out some other services and see what cool applications we can build with them. I hope you enjoyed this post!
For additional information on this topic you can refer to the official Computer Vision Documentation.


