Build Your Own Serverless Writing Pad with Gatsby, Netlify, and FaunaDB
In this article, you'll learn how to build your own authenticated writing pad for keeping notes and valuable ideas that sometimes appear in the most unexpected moments, without writing server code. That's right, no servers involved. Well, sort of 😊.
If you have a blog, you may have experienced the situation when you suddenly wake up from sleep with a brilliant idea for the next article that you need to quickly write down not to forget.
You start poking around in your phone in search of an app or something that can help you to capture this quickly dissolving thought.
Facebook - that’s not for this, Gmail - don’t like the interface, Badger In Da House, - who installed this 💩 on my phone? Wait, there are 10 notifications in my Slack group, I better check what’s going on.
Then you painfully realize that your idea has disappeared like tears in rain (can you guess the reference?) and there’s no way to turn it back (sad music plays in the background).
So, to remedy this situation we’re going to create our personal authenticated corner of the internet that we can always count on.
No ads, no bs, always available in one click from your home screen or a bookmark tab.
Alright, let’s get to work!
Creating a FaunaDB database
To follow along you’ll need a FaunaDB account. Fauna is, as far as I know, only one NoSQL 100% ACID compliant database. The acronym ACID (Atomicity, Consistency, Isolation, Durability) doesn’t have anything to do with drugs or chemistry in this case. At a high level it means that your data is in a safe hands and it won’t suddenly disappear from the face of the Earth.
With the Always Free plan you are given 5 GB of storage, 100K read ops per day, 50K write ops per day, and data transfer of 50 MB per day, which is more than enough for our simple application.
To interact with the FaunaDB we have a couple of different language choices - GraphQL, FQL (Fauna query language). Today we’ll be using GraphQL since it’s the most popular option by far.
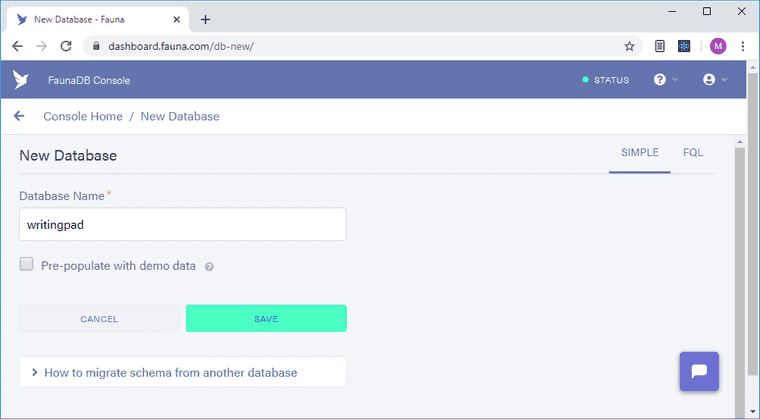
Once you signed in, click New Database button, enter the name of the database: writingpad, and click Save.
Defining a GraphQL schema
Now that we have a database created we need to define the data structure or a schema. To do this, first, let’s create a project folder somewhere on your computer with the name of writingpad, then in this folder create a file schema.gql.
type Note {  text: String!}
type Query {  allNotes: [Note!]!}
So, here we’ve defined a Note type with the string text field, and the Query type, which returns an array of Note items.
Note In GraphQL types are capitalized and the fields whose types have an exclamation mark ! next to them are non-null fields. These are fields that won’t return a null value when you query them.
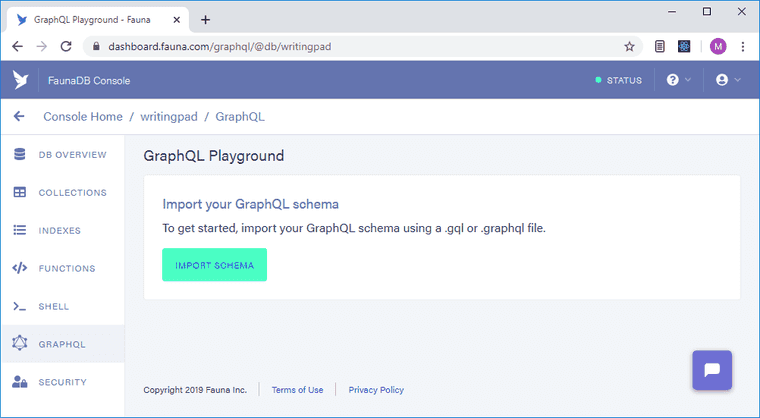
Next, we need to upload our schema. Select our writingpad database, click on GraphQL section in the sidebar and upload our schema.gql file using Import Schema button.
Believe it or not, that’s it! The database is set up and ready to use.
The great thing about FaunaDB is that it eliminates a huge amount of work by handling the standard CRUD operations for us. It just takes all that boilerplate away and makes it easier for us to work with things.
If you open up the DOCS section in the GraphQL playground, you’ll see all available queries and mutations. The query is going to be used to fetch all the notes from our writing pad, the mutation - to store them. Queries and mutations are two top-level types in GraphQL.
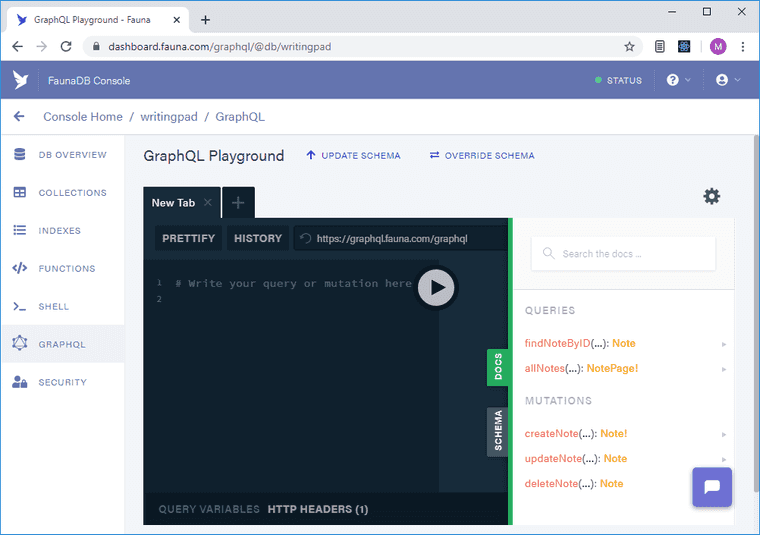
Let’s try creating a record in our database. Paste the following mutation in the GraphQL playground tab:
mutation { createNote(data: { text: "Owls are cool." }) { _id text }}GraphQL allows to mutate and query the new value of the fields with one request. That’s what we’re doing here. We creating a note with the given text and then GraphQL will return the value of the text field back.
Now if you press Play button, you’ll see the following result:
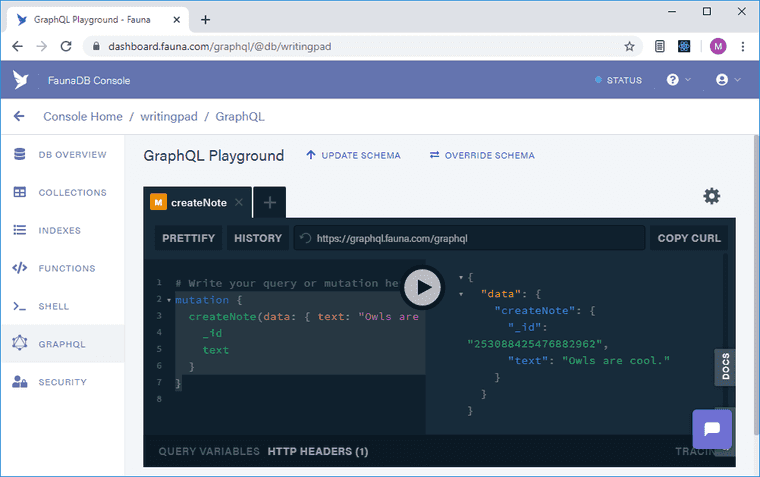
Alright, that seem to work. Now let’s try to get all records with this query:
query { allNotes { data { _id text } }}We get our one note back. Great! It works.
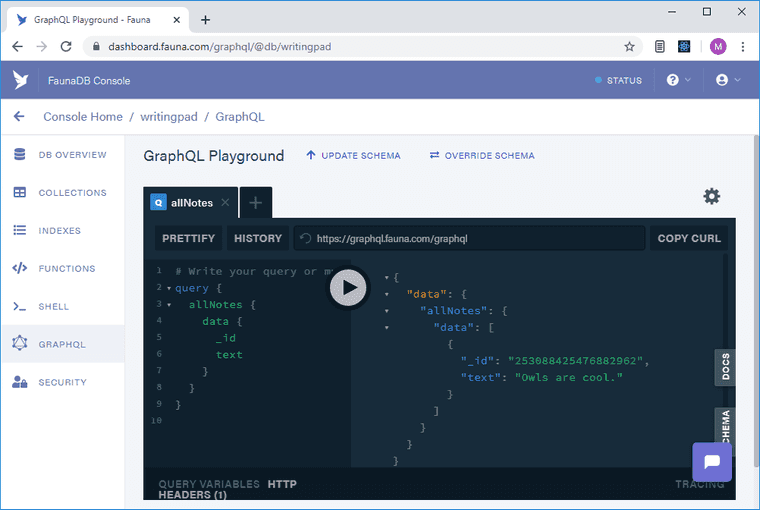
Congratulations! It only took a couple lines of code to create a fully-functional database where we can create, update, delete and query data.
Setting up API keys
To make sure that no one else could connect to our database, we need to get a server secret key. Navigate to the Security tab in the sidebar, click New key, enter the name of the key that you like, select Server role, click Save.
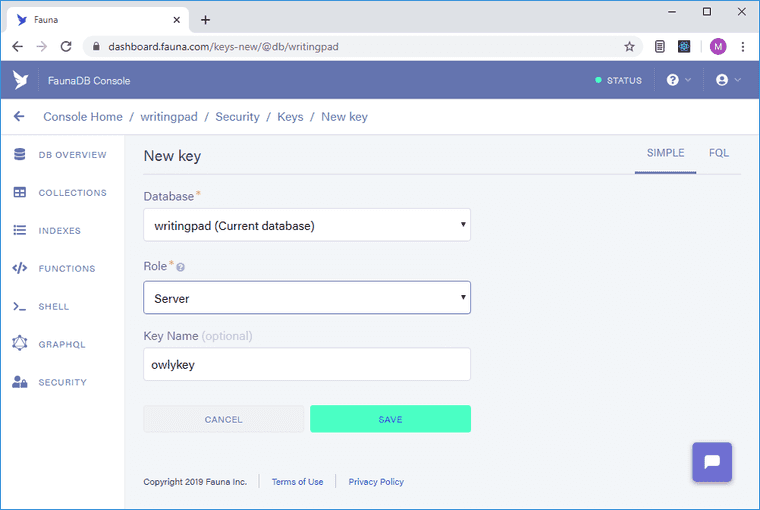
After doing that, you’ll see a secret key. Create a .env file in our project root folder, copy this key and paste it in like so:
FAUNA_SERVER_SECRET=<your secret fauna key>
Installing necessary libraries
After that, we can install packages that we’ll need in the process.
First, we’ll install Netlify CLI to be able to test our serverless functions locally.
npm install netlify-cli -gTo work with our secret variables and perform network requests we’ll need Axios and dotenv. Run this command from our root folder:
npm init -ynpm install axios dotenvThis will create a package.json for us and install these libraries and their dependencies.
Creating a serverless function
Now that we have our API key and libraries set up, we can create our first serverless function. For this we’re going to be using Netlify. You’ll need to create a free account to follow along.
Here’s a short visual on how our serverless functions get their data:
Ok, I think you get the idea 😊.
Since we’re going to need to send at least 4 queries to get, create, update and delete notes, it makes sense to create a helper function that will take a query and send it.
In our root folder, let’s create a functions folder, and in the helpers sub-folder create a file send-query.js.
require("dotenv").config();const axios = require("axios");
module.exports = async (query, variables) => {  const result = await axios({    url: "https://graphql.fauna.com/graphql",    method: "POST",    headers: {      Authorization: `Bearer ${process.env.FAUNA_SERVER_SECRET}`    },    data: {      query,      variables    }  });
  return result.data;};
Here we’re first loading our .env file and configure it to get our FaunaDB secret, then we’re loading Axios library that will help us with requests.
After that we’re exporting an async function that takes a query and variables. We need variables so that we can send different data to this function to get different results from the query.
Inside of this function we’re making an Axios call with our secret key, getting the results back and returning them. Very simple operation that doesn’t require any heavy libraries.
Note The beauty of Graphql is that you have one unified url for all your requests.
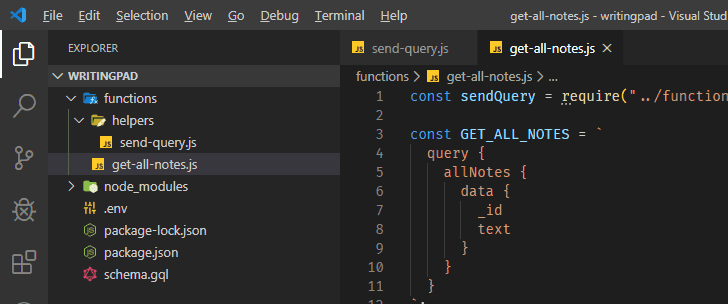
Now we need to create a query itself. In our functions folder create a get-all-notes.js file with the following contents:
const sendQuery = require("./helpers/send-query");
const GET_ALL_NOTES = `  query {    allNotes {      data {        _id        text      }    }  }`;
exports.handler = async () => {  const { data, errors } = await sendQuery(GET_ALL_NOTES);
  if (errors) {    return {      statusCode: 500,      body: JSON.stringify(errors)    };  }
  return {    statusCode: 200,    body: JSON.stringify({ notes: data.allNotes.data })  };};
Here we’re getting in our sendQuery helper, defining our query that we’ve played around in the FaunaDB GraphQL playground, and exporting a handler function that is typically present in serverless functions.
We’re using Node-style syntax here and creating a named export called handler. In this handler we’re calling our helper function, which will give us back our data, or an error if it happens. Then we’re converting the result into a JSON string in both outcomes.
So far you should have the following project structure:
Testing our functions with Netlify Dev
To test this function we’ll use our Netlify local dev environment, because otherwise we’d have to deploy it each time to see what changed.
Let’s login to Netlify.
netlify loginYou’ll see an application authorization request, click Authorize.
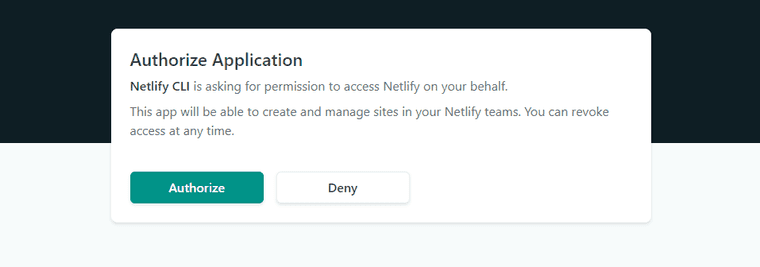
Once we’re logged in, we need to tell Netlify where our function lives.
In our root folder create netlify.toml file with the following contents:
[build]  functions = "functions"
[[redirects]]  from = "/api/*"  to = "/.netlify/functions/:splat"  status = 200
Here, with the [build] key, we’re telling Netlify where our functions live. By default, all functions in Netlify are located in a special place at /.netlify/functions/<your function name>. To make things a bit easier we can also set up a [redirect] key to make our function live at /api/<your function name>.
Now we can run Netlify dev from our root folder and test our function:
netlify devYou’ll see a message that the server is ready for connections.

Now if you open http://localhost:8888/api/get-all-notes, you should see the following response:

We can see that our serverless function is working! Awesome.
Setting up front-end
To show the results of our queries in a more presentable way that just a JSON on an empty page, we’ll use Gatsby. In the root of our project run the following command:
npm install gatsby react react-domTo let Netlify Dev know that this is a Gatsby site, create an empty gatsby-config.js file in the root of our project and add a script named gatsby in your package.json like so:
... "scripts": { "test": "echo \"Error: no test specified\" && exit 1", "gatsby": "gatsby" },...Next, we’re following a standard Gatsby path and creating a main page of our app. Create a src folder, and in it create a pages sub-folder with the index.js file that has the following content:
import React, { useEffect, useState } from 'react';import axios from 'axios';
export default () => {  const [status, setStatus ] = useState('loading');  const [notes, setNotes] = useState(null);
  return (    <main>      <h1>The Writing Pad</h1>      { notes ? (<p></p>) : (<p>Loading notes...</p>)}    </main>  )}
After importing all necessary modules that we’ll need, we’re using useState hook in our component to manage our loading status and keep track of our notes. Below, we’re returning a Loading notes… text if there are no notes yet.
It’s time to check how it works. Start Netlify Dev with this command:
netlify dev
Open http://localhost:8888/ in your browser and should see our site up.

Great, now we need to show our notes. Update our index.js file to the following state:
import React, { useEffect, useState } from "react";import axios from "axios";
export default () => {  const [status, setStatus] = useState("loading");  const [notes, setNotes] = useState(null);  useEffect(() => {    let canceled = false;    if (status != "loading") return;    axios("/api/get-all-notes").then(result => {      if (canceled === true) return;
      if (result.status != 200) {        console.error("Error loading notes");        console.error(result);        return;      }
      setNotes(result.data.notes);      setStatus("loaded");    });
    return () => {      canceled = true;    };  }, [status]);
  return (    <main>      <h1>The Writing Pad</h1>      {notes ? (        <ul>          {notes.map(note => (            <li>Note: Hardcoded for now... </li>          ))}        </ul>      ) : (        <p>Loading notes...</p>      )}    </main>  );};
Here we’re passing an array with our status variable to the useEffect hook as a second argument, to run this hook only when this variable changes. Next, after checking that our status is not loading, we’re making our api call.
In the axios call we’re again checking our status variable and then the result status code, and if it’s anything other than 200, this means that we’ve got an error. But if there’s no errors we finally store our notes into the state and setting status to loaded.
In the last return we’re setting cancelled to true so that when we’re leaving the page or this component unmounts, React will stop executing this function.
Since notes is an array, in our JSX we can map over it and display it as a regular unordered list. Start the dev server again to see what we’ve got so far.

To actually display our notes we’re going to create a component. In the src/components folder create a note.js file with the following:
import React from "react";
const Note = ({ note }) => {  return <p>{note.text}</p>;};
export default Note;
Here we’re defining a functional React component which will accept a note and simply render it as a paragraph. Next, in our index.js file we can import it and use it to display our notes.
import React, { useEffect, useState } from "react";import axios from "axios";import Note from '../components/note';
export default () => {  const [status, setStatus] = useState("loading");  const [notes, setNotes] = useState(null);  useEffect(() => {    let canceled = false;    if (status != "loading") return;    axios("/api/get-all-notes").then(result => {      if (canceled === true) return;      if (result.status != 200) {        console.error("Error loading notes");        console.error(result);        return;      }      setNotes(result.data.notes);      setStatus("loaded");    });    return () => {      canceled = true;    };  }, [status]);
  return (    <main>      <h1>The Writing Pad</h1>      {notes ? (        <ul>          {notes.map(note => (            <li key={note._id}>              <Note note={note}/>            </li>          ))}        </ul>      ) : (        <p>Loading notes...</p>      )}    </main>  );};
The next thing that we’re going to do is add the ability to create notes. For that we’ll need, you guessed it, another serverless function. In out functions folder create a file create-note.js.
const sendQuery = require("./helpers/send-query");
const CREATE_NOTE = `  mutation($text: String!){    createNote(data: {text: $text}){      _id      text    }  }`;
exports.handler = async event => {  const { text } = JSON.parse(event.body);  const { data, errors } = await sendQuery(CREATE_NOTE, { text });
  if (errors) {    return {      statusCode: 500,      body: JSON.stringify(errors)    };  }
  return {    statusCode: 200,    body: JSON.stringify({ newNote: data.createNote })  };};
As you can see, here we’re doing almost the same thing that we did with get-all-notes.js, only here we’re setting up a mutation and passing in a variable (that’s why in sendQuery we previously added a second argument variable).
Next, we’re creating our handler, where we’re receiving an event, getting our text from it’s body, sending a query which creates a note and finally getting the results back. The rest of the function is pretty much the same as in get-all-notes.js, only in success situation we’re returning a new note that was created.
Now we’re ready to create a form to submit our notes. In the components folder create a new form.js component:
import React, { useState } from "react";import axios from "axios";
const Form = ({reloadNotes}) => {  const [text, setText] = useState('');  const handleSubmit = async event => {    event.preventDefault();
    if(text === '') return;
    await axios.post('/api/create-note', { text });
    setText('');    reloadNotes();  }
  return (    <form className="note-form" onSubmit={handleSubmit}>      <label htmlFor="textarea">Add notes        <textarea          id="textarea"          value={text}          onChange={event => setText(event.target.value)}        ></textarea>      </label>      <button className="save-button" type="submit">Save note</button>    </form>  );};
export default Form;
Our form component accepts reloadNotes function that we need to pass to it from our index page. This is needed so we can refresh the list of notes after we save the new one. Next, we’re again using useState() hook to store the value of controlled textarea element. When we submit our form, we’re grabbing the value from our textarea, making a POST request to our serverless function create-note with this value, clearing out textarea and reloading the list of notes that we have on the page.
Now we can add this form to the index.js file and pass down our reloadNotes helper function.
...import Form from '../components/form';...
const reloadNotes = () => setStatus('loading');
return (    <main>      <h1>The Writing Pad</h1>      <Form reloadNotes={reloadNotes}/>      {notes ? (        <ul>          {notes.map(note => (
Ok, let’s test how everything works so far. Stop your dev server if it was running and start it again (netlify dev).
Great! Seems like the main functions are working as expected. What’s next? Oh yes, it would’ve been good to have the ability to delete our notes, right? Let’s do this.
In the functions folder create yet another file called delete-note.js:
const sendQuery = require("./helpers/send-query");
const DELETE_NOTE = `  mutation($id: ID!) {    deleteNote(id: $id){      _id    }  }`;
exports.handler = async event => {  const { id } = JSON.parse(event.body);  const { data, errors } = await sendQuery(DELETE_NOTE, { id });
  if (errors) {    return {      statusCode: 500,      body: JSON.stringify(errors)    };  }
  return {    statusCode: 200,    body: JSON.stringify({ deletedNote: data.deleteNote })  };};
Everything here works the same as in previous two functions except that we’re passing a note id to delete it.
To finish this feature we’ll need to modify our note.js component.
Update the note.js file to the following state:
import React from "react";import axios from "axios";
const Note = ({ note, reloadNotes }) => {  const handleDelete = () => {    axios.post('/api/delete-note', { id: note._id}).then(reloadNotes);  }
  return (    <>       <p>{note.text}</p>      <button onClick={handleDelete}>Delete</button>    </>  )};
export default Note;
Here we’re adding a new handler that’s called handleDelete as well as an actual delete button.
We’re also passing our reloadNotes function from the index.js component to reload notes after deletion.
...{notes.map(note => ( <li key={note._id}> <Note note={note} reloadNotes={reloadNotes}/> </li>))}...Restart your dev server so that netlify dev could pick up our changes and after that you should see the following:
Great! Looks like the basic functionality is working.
Making it look pretty
Alright, to make everything look not so horrible, let’s add some styles to this thing. In the pages folder create an index.css file and import it in index.js like so: import './index.css';.
*,*:before,*:after { box-sizing: border-box;}body,html { height: 100%; margin: 0; background-color: #292f4c; font-family: Georgia, 'Times New Roman', Times, serif;}main { max-width: 800px; margin: 0 auto; border: 1px solid #dedede; background-color: #fff; height: 100vh; padding: 2rem;}h1 { text-align: center;}label { width: 100%;}textarea { border: .125rem solid #aaa; border-radius: 3px; box-shadow: inset 0 1px 2px rgba(0, 0, 0, 0.3); font-family: inherit; font-size: 1.25em; font-weight: 300; margin-top: .5em; padding: .5em; transition: background-color 250ms ease-out; width: 100%; display: block;}form.note-form { margin: 2rem auto; display: flex; align-items: flex-end; justify-content: space-between;}.save-button, .login-btn { background-color: #512da8; border: 0; border-radius: 3px; box-shadow: 0 1px 3px rgba(0, 0, 0, 0.3); color: #fff; font-family: inherit; cursor: pointer; font-weight: bold; margin: 0 auto; padding: 20px; text-align: center; text-transform: uppercase; margin-left: 20px;}.login-btn{ margin: 0 auto; display: block; background-color: #663399;}button[type="submit"]:hover,button[type="submit"]:focus { background-color: #7e56e0;}ul { list-style: none; padding-left: 0;}ul li { display: flex; justify-content: space-between; align-items: center; border: 1px solid #ccc; background-color: #f5f5f5; margin: 10px 0; padding-left: 20px;}ul li button { padding: 10px; height: 40px; margin: 0 20px; cursor: pointer;}ul li p{ overflow-y: scroll; max-height: 4.5em; width: 100%;}Here’s how things should look by this point.
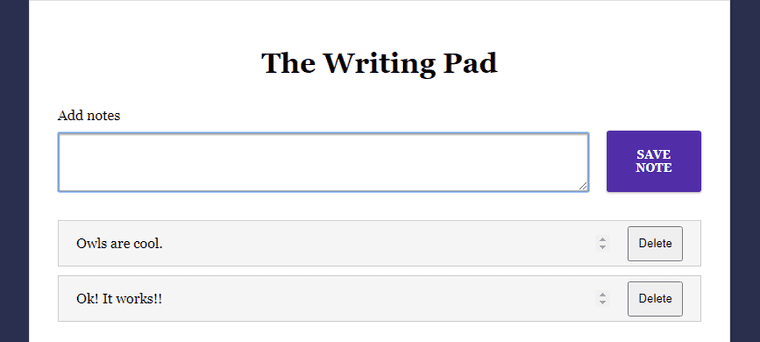
How about adding a login page? First, we’ll need to create a repo and Netlify site.
Hooking up our site to Git
Before committing our site to Git, it’s a good idea to make sure that we don’t accidentally commit our secret keys. Create a .gitignore file in the root folder of our repo.
public.cachenode_modules*DS_Store*.env.idea/Now you can create a new repo on GitHub, then add and push our code to it:
git init# !! Use your repo name belowgit remote add origin git@github.com:yourusername/yourreponame.gitgit add -Agit commit -m 'initial commit'git push -u origin masterCreating a new Netlify site
Netlify CLI allows us to easily create a new site right from the command line. This is a huge time saver. Stop the development server if it was running and run the following command from the root of your project:
netlify init
It will ask several questions:
- What would you like to do? — choose “Create & configure a new site”
- Site name (optional) — writingpad
- Team — choose which Netlify team you want to add this site to
- Your build command — gatsby build
- Directory to deploy — public/

It’ll create some hooks so whenever we push to this repo it’ll automatically deploy to Netlify.
Configuring site’s environment variables
Alright, now that we have our site created, we need to configure our database key on Netlify. Run the following command:
netlify openThis will open a browser with our site. Navigate to the Settings tab and there, in the section Build & Deploy -> Environment add our secret key.
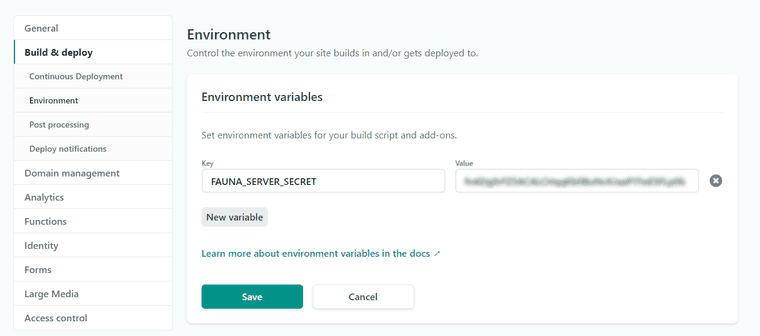
Adding authentication with Netlify Identity
Now let’s set up Netlify Identity. Click on Identity tab and then Enable Identity.
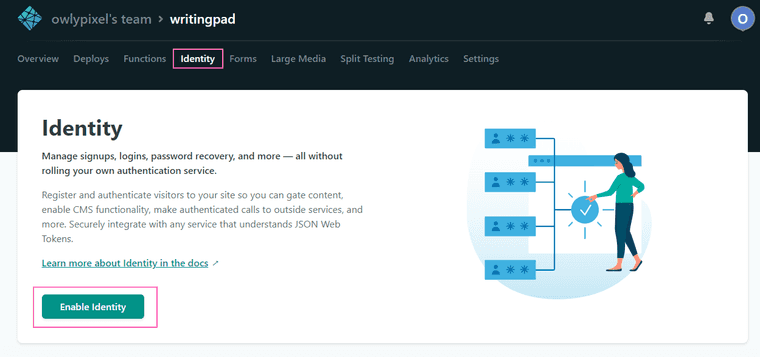
After finishing this configuration, we can install necessary libraries and proceed with our code.
To make things a bit easier we’ll use gatsby-plugin-netlify-identity.
npm install gatsby-plugin-netlify-identity react-netlify-identity-widget @reach/dialog @reach/tabs @reach/visually-hiddenNow in our gatsby-config.js we’re going to tell Gatsby to use this plugin:
module.exports = { plugins: [ // You should only have one instance of this plugin { resolve: `gatsby-plugin-netlify-identity`, options: { url: `https://your-identity-instance-here.netlify.com/` // required! } } ]}This plugin requires a Netlify site URL. We can find it on the Identity tab of our site.
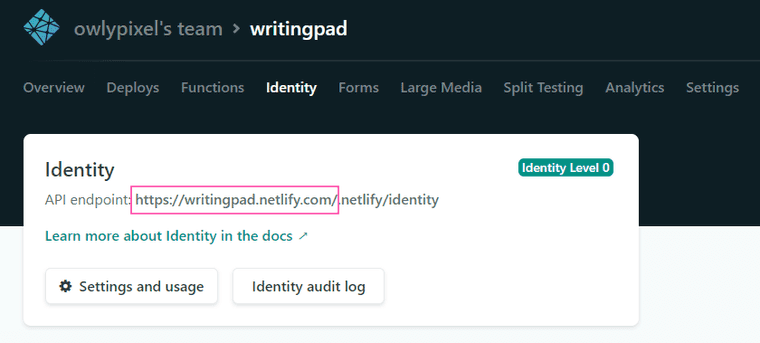
Note that we need only the domain name part of the URL
Now let’s modify our index.js file to include Netlify identity functions and markup. The idea here is to show a login button when user is not logged in, and after successful login, show the whole form that we’ve build before. Basically, we want our whole site to be hidden by login, so we’ll put our identity stuff right into our index page.
import React, { useEffect, useState } from "react";import axios from "axios";import Note from '../components/note';import Form from '../components/form';import './index.css';import IdentityModal, { useIdentityContext } from "react-netlify-identity-widget"import "react-netlify-identity-widget/styles.css"
export default () => {  const [status, setStatus] = useState("loading");  const [notes, setNotes] = useState(null);  useEffect(() => {    let canceled = false;    if (status != "loading") return;    axios("/api/get-all-notes").then(result => {      if (canceled === true) return;            if (result.status != 200) {        console.error("Error loading notes");        console.error(result);        return;      }      setNotes(result.data.notes);      setStatus("loaded");    });
    return () => {      canceled = true;    };  }, [status]);
  const reloadNotes = () => setStatus('loading');    const identity = useIdentityContext()  const [dialog, setDialog] = React.useState(false)  const name =    (identity && identity.user && identity.user.user_metadata && identity.user.user_metadata.full_name) || "NoName"  const isLoggedIn = identity && identity.isLoggedIn
  return (      <main>        <h1>The Writing Pad</h1>        {identity && identity.isLoggedIn ? (          <>            <button className="login-btn" onClick={() => setDialog(true)}>              {isLoggedIn ? `Hello ${name}, Log out here!` : "LOG IN"}            </button>            <Form reloadNotes={reloadNotes}/>              {notes ? (                <ul>                  {notes.map(note => (                    <li key={note._id}>                      <Note note={note} reloadNotes={reloadNotes}/>                    </li>                  ))}                </ul>              ) : (                <p>Loading notes...</p>              )}          </>        ) : (          <button className="login-btn" onClick={() => setDialog(true)}>            {isLoggedIn ? `Hello ${name}, Log out here!` : "LOG IN"}          </button>        )}        <IdentityModal showDialog={dialog} onCloseDialog={() => setDialog(false)} />      </main>  );};
First, we’re importing IdentityModal, useIdentityContext and some styles.
useIdentityContext is both hook and a context at the same time. It lets us initialize Netlify identity instance that contains all the identity information for the current user.
In our JSX we’re checking if the user is logged in and if not, we’re showing a login button. If the user is logged in, we’re showing our notes and a form.
IdentityModal is placed at the bottom, but since it’s a portal, it really doesn’t matter where to put it.
We’re using React’s useState hook to keep track of the modal, and showDialog function shows or hides the modal depending if it’s set to true or false.
At this point we’re ready to commit our work and check the results.
git add -Agit commit -m "add netlify identity"git pushOnce you push your commit, Netlify will automatically rebuild and redeploy the site.
Now, if you open https://writingpad.netlify.com/ you should see this:

Once you click the Login button, you’ll be presented with the sign up dialog.
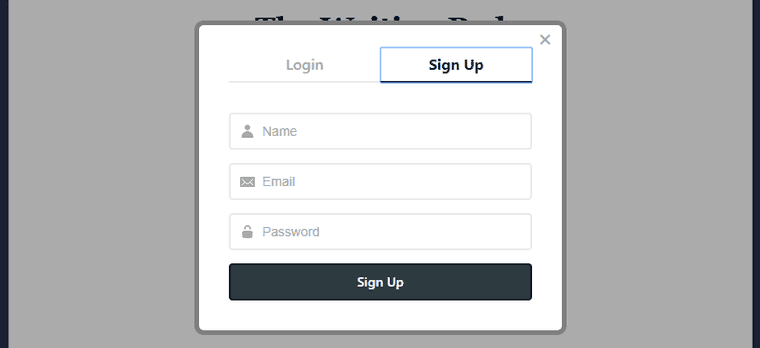
After confirming your email you now are able to use the website. Awesome!
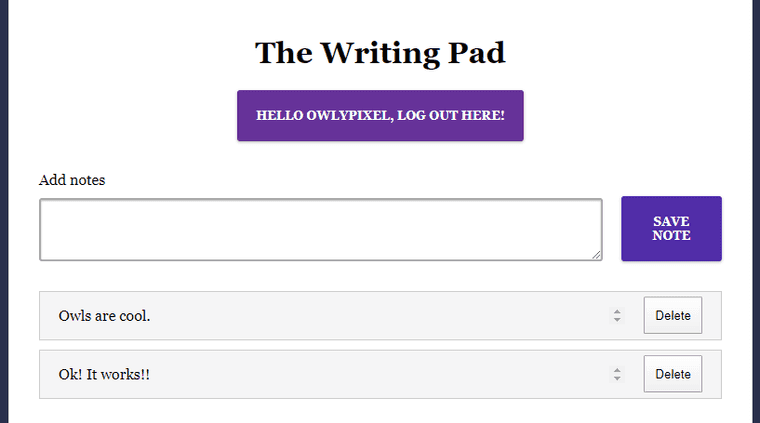
Wrapping Up
That is pretty much the end of our coding journey today. There are certainly many improvements that can be added to our writing pad. Things like the ability to edit posts, improve the overall look and design, etc.
The cool thing is that now it’s completely under your control. If you’re interested in adding some features, research the topic, implement them and now you have even more awesome app!
I wish you all the best, and I am very much looking forward to reading about your JAM Stack projects.
Cheers!
P.S. This post is heavily based on live-streams and tutorials from Jason Lengstorf, you can follow him on Twitter for more fun and educational web development content.


